ZEITDice One, Getting Started Guide / Camera Manual
How to start capturing with your ZEITDice One.
Push the button until the green light comes on: Congratulations, your first timelapse session with the ZEITDice One has started.
Hardware Features
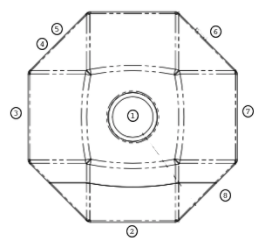
120° wide angle lens
Tripod Mount (1/4"-20)
USB Micro-B Connector for charging and file system access (Only use supplied cable with extra long connector tip for a solid connection)
Battery charging indicator light: red means it's charging, green means it's fully charged. It can take up to 24 hours to fully recharge.
Mode indicator light, flashes when image is taken and corresponds when button (#6) is pushed.
Button, push as deep until you feel and hear a click.
There used to be a magnet here, but it was not strong enough to hold the camera steady, so we removed it.
Pre-Requisites & General Notes
This guide is continuously updated to match the most recent firmware (the software that runs on the ZEITDice) available. Therefore please make sure you actually have the most recent firmware installed. If your ZEITDice shipped before October 1st 2018 you will have to update.
Please charge the device for 24 hours via the supplied USB cable (until the battery charging indicator light, #4 in the hardware illustration above, goes from red to green).
When disconnecting the device from your computers USB port, always use the operation systems "Eject" function to unmount the device before unplugging it to prevent corruption of the devices file system.
Only use the provided USB cable.
No matter what mounting feature of the device you might use (Magnets, Strap, Tripod Screw), always use a secondary cable or rope to secure the camera additionally in case the primary mounting method breaks.
Be careful with the USB connector on the device when it's plugged in, the connector can break off if it's pushed too hard in any direction.
Setup Mode can only have one device (smartphone, tablet, computer) connected to it's WIFI Access Point during setup.
Operation
The ZEITDice One Timelapse Camera has only one button to enter Capture Mode, Setup Mode or Off Mode. Pushing the button cycles through the modes and the time the button is let go is essential to enter a mode.
Capture Mode
Push the button until the mode indicator light turns green (> 1 second) and let go.
The mode indicator light (#5 in the hardware illustration above) will rapidly flash green 5 times before the camera starts capturing on the set interval. You will learn how to change the interval in the next section.
To exit capture mode push the button again until the mode indicator light shows green, let go and watch it flash red 5 times, capture mode has been exited and Setup Mode entered, here you can turn off the camera by pushing the button again until the mode indicator light shows red.
Setup Mode
Push the button until the mode indicator light turns yellow (> 2 seconds) and let go.
The mode indicator light will stay yellow.
To access your images: You can now plug the device into your computer via USB and access it's file system like you would usually do with an external hard-drive or memory.
To change the settings: In setup mode the device opens up a WIFI Access Point (AP) that you can connect to with a smartphone, tablet or computer, called "TIMELAPSE_AP". Connect to that WIFI AP (password is 'timelapse' and should be changed during setup to something only you know) and open up a browser, instead of entering a website URL, like www.zeitdice.com, enter 192.168.4.1, the following interface should appear:
After logging in you can see the current state of the device (battery level, memory usage, firmware version) and change all settings the camera has to offer: Interval, Image Resolution, ISO, Shutter Speed, EV, Timezone, WIFI Configuration and Cloud Settings;
Off Mode
You can turn off the camera by pushing the button in setup mode until you the mode indicator light shows red.
Trouble Shooting
If the device is not recognized as external memory by your computer, please try a Hardware Reset or reboot your computer and try again, if that does not help, please contact support.
Hardware Reset: If the device becomes unresponsive, please push the button for 1 minute to initiate a hardware reset. This will NOT delete the images.
You will receive an email to activate your account
Configure your ZEITDice One (the camera will have to be within range of your WIFI and it needs to be 2.4GHz WIFI not 5GHz)
Plug your ZD into your computer via USB and find the settings.ini file, open it in a text editor.
Change the following values:
Interval: Change it to a value in seconds that you need to receive images in the cloud. 600 (10 minutes) is a good start if you want to run for a week or more, faster, up to 10 seconds is possible but the battery will get used up within a day.
Wifi_Upload: Set to INSTANT
SSID: Set to your Wifi Name
PASSWORD: Set to your Wifi Password
Email: Set to the email address you used for signing up to ZEITCloud
Securely eject your ZD from your computer
Start your ZD as usual by pushing the button for 1 second
On your dashboard you will see the most recent image your ZEITDice took and can create timelapse videos based on what has been captured.
ZEITDice One, Update the Firmware (FW)
We are constantly improving the capabilities of the camera, the following explains how to benefit from free firmware updates.
To get the newest features onto your ZEITDice, you need the newest firmware installed on it. If you have your ZEITDice connected to the ZEITCloud and uploading regularly you can push the newest firmware over-the-air (OTA) onto your ZEITDice, please reach out if you want to try this feature..
All ZEITDice shipping after October 1st 2018 come with FW Version 1.2.3 installed, if your ZEITDice shipped before that you can update the FW following theses steps:
Download and Update Firmware
Download the most recent firmware file from here (FW 1.2.3, released Sept. 30th 2018).
Plug your ZEITDice via USB into your computer, it should show up as a mass-storage device, like a thumb drive / external memory, called TIMELAPSE or ZEITDICE.
Move the firmware.zd file you just downloaded onto the device.
Unmount and unplug the ZEITDice.
Turn it off and on again until you see lights flashing like in the video above.
After the new firmware is installed (lights go dark) plug it back into your computer
Delete the files log.txt, settings.ini (make a backup in case you don't know your settings) and the folder Snapshots (if it exists).
Unmount and unplug the camera. You are done. (a new log.txt and settings.ini file will be generated next time you turn on the camera, then you can also edit the settings.ini file).
Confirm Firmware Update
Enter "Setup Mode" by pushing the button until the light permanently shows yellow.
Use your smartphone, tablet or computer with WIFI to look for a WIFI Access Point (AP) called "TIMELAPSE_AP".
Connect to the WIFI AP with password "timelapse", you should change the WIFI AP Name (SSID) and password after your first login.
Open a browser on your smartphone, tablet or computer you connected to the WIFI AP with and enter "192.168.4.1" into the address bar. The current Firmware Version will show in a table in the interface that is loaded.